

Perhaps at first glance this update may seem like a minor update, since visually the changes are not very visible, but in reality it is a great update, since we went from 8 to 32 bits, and from 12 to 24 volts. Additionally, we upgraded the controllers from the TMC2130 to the TMC2209 and the bed from an aluminum MK3 to a magnetic bed with inserted magnets.
As in the previous update, we are going to explain it in a modular way (as far as possible), so that the user can partially update it if he wishes.
If you have the P3Steel and want to update to 3DSteel V2 in the same update, you can use as a reference what is indicated in this article:
https://www.hta3d.com/en/blog/p3steel-update-tutorial-3dsteel
And combine it with this one.
Electronics with SKR board and TMC2209 drivers
The SKR board is one of the most widely used 32-bit boards, due to its great features and versatility. Together with the TMC2209 drivers they form a very efficient and high performance set.
The quality of construction, its connections, and the possibility of being used at 24V make this combination a very balanced and future-proof solution.
SKR 2 version: https://www.hta3d.com/en/product-bundles/components-to-upgrade-electronics-to-3dsteel-v2-skr-2-and-tmc2209-uart
SKR 1.4 Version (not available at the moment, because of no stock of LPC chips wordwide) Here you have the corresponding pack.
If you wish, you can use the TMC2130 drivers, since they are also compatible, you just have to take it into account when updating the firmware and when configuring the jumpers that we find on the board.
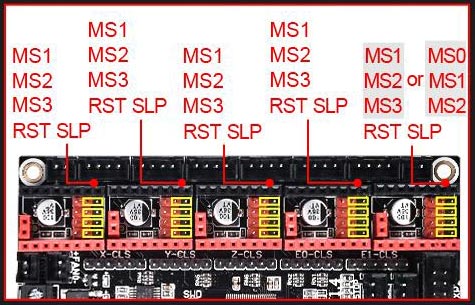
Jumper placement scheme for UART configuration (TMC2209):

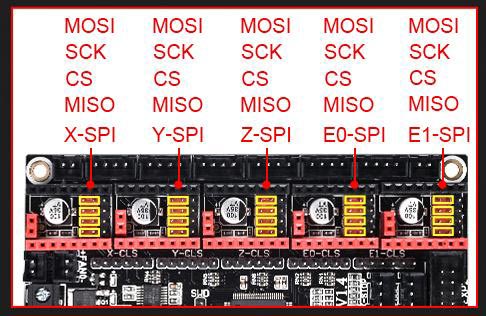
Jumper placement scheme for SPI configuration (TMC2130):
Yes, they can be combined, and you can install for example the TMC2209 only for the X and Y axis.
It can even be combined with DRV8825 drivers for anyone upgrading from P3Steel, in which case this is the schematic for STEP/DIR drivers, using old drivers for X and Y is not recommended in order to maintain compatibility with printed parts:
Jumper placement scheme for STEP/DIR configuration (DRV8825):
If the controller has a Sensorless homing pin at the bottom of it, it will automatically recognize it, otherwise, a small cable would have to be used from this pin to the corresponding limit switch signal.
24V power supply with magnetic heated bed, resistance and fans
It is important to note, that 24V is not compatible with Ramps 1.6+, since Mega boards are not designed to withstand this voltage, they will burn out. It is essential to change the plate to the SKR. However the SKR can operate at 12V.
This update is something that seems difficult to see with the naked eye, but when working at 24V the printer obtains the following advantages:
- Greater efficiency in all your electronic components:
- Heated bed.
- Hotend resistance.
- Fans.
- Drivers.
- Stepper mottors.
- Even the power supply itself is more efficient and heats up less.
- Greater security in the connections and cables, since they heat up approximately 75% less, we largely avoid heating problems in the terminals.
- The mosfets heat up much less, due to the current reduction. This has historically been a problem on Ramps 1.4 and older plates.
We have prepared these two packs:
- Pack with common fans.
- Pack with ball bearing fans, they are more efficient, vibrate less, make less noise and last much longer.
Mk3 beds could be used, as long as the adaptation to 24V is made in the solder points of the PCB (depending on the manufacturing batch there are convertible beds and others not). This can be verified simply by looking at the bottom, if it has 3 large solder points it is the version that can be adapted.
Other changes:
Hotend components.
On the 3DSteel V2 we offer the best version available to date as standard, that is, the bimetal version. This is not strictly necessary, since it will also work well with more basic versions, if you want to update this component you can do it with this pack.
It is advisable to have some Teflon available, in the bimetal version we use the teflon tubo with inner diameter of 1.9mm so that in this way the movement of the extruder is as precise as possible.
X - Z Axis
The X axis parts have been updated by adding two stops that facilitate axis leveling, and two pulleys to easily move the Z axis spindles manually. Using Marlin 2.0.7 or higher it can also be done automatically from the LCD or using the G34 code.
You can download the parts from this link.
You can also download a small cap that can be added on the rods to take advantage of the 3DSteel V1printed parts.
Or buy the item with the parts printed by us in this link.
Y Axis
The printed parts have been modified so that the strap screws are on the bottom, so the strap can be easily changed when needed.
You can download the printed parts using this link.
Or buy the item with the pieces printed by us.
Changes in firmware
We take as a starting point the hardware of our 3DSteel V2, if you update everything you only have to copy the file "firmware.bin" of the latest version available onto the SD card, when it is run for the first time it will erase the previous memory, so calibration adjustments will need to be performed again. In the following links you can find what you need:
If you decide not to do any of these updates, and therefore partially update the printer, you have to compile the new firmware based on the changes that are not made.
Keeping voltage at 12V
In configuration_adv.h:
#define CHOPPER_TIMING CHOPPER_DEFAULT_12V
In this way the drivers will work at 12V correctly, not updating it can damage them.
Keeping TMC2130 drivers, instead of TMC2209.
This can be a good way to save on the update, for this you have to configure the following lines:
In configuration.h:
#define X_DRIVER_TYPE TMC2130
#define Y_DRIVER_TYPE TMC2130
#define Z_DRIVER_TYPE TMC2130
#define E0_DRIVER_TYPE TMC2130
Each controller is defined separately, so they can also be mixed.
When changing the driver, the sensitivity of the Sensorless homing function must also be adjusted:
#define X_STALL_SENSITIVITY  8
#define X_STALL_SENSITIVITY  8
The sensitivity of the TMC2209 goes on a scale of 0 to 255, while that of the TMC2130 goes on a scale of -64 to 63, so the value using the TMC2130 is usually much lower. This can be adjusted once the 3D printer is running.
To use the sensorless homing of the TMC2130, the logic of the limit switches must be changed from "false" to "true":
#define X_MAX_ENDSTOP_INVERTING true
#define Y_MAX_ENDSTOP_INVERTING true
And if we activate at least one TMC2130 controller, the SPI connection of the board must also be activated:
#define TMC_USE_SW_SPI
"Z Gantry Calibration"
If you do not want to change the pieces of Z or place the small additions, it is better that you disable this option present in configuration_adv.h otherwise the printer will try to crush the cables if it is executed by mistake:
//#define MECHANICAL_GANTRY_CALIBRATION
Our recommendation in this regard is that you place at least the small additions since it is a very comfortable and useful function.
Once all these steps have been done, to make all the connections on the board, you can follow the connection diagram in our assembly tutorial number 3, starting from step 5:
Once you have everything installed, it is recommended to do the checks and calibrations in this tutorial.
One of the points that must be checked with special attention is the direction of the motors, since there are differences in the direction between the different controllers that can be used (TMC2130, TMC2209 and DRV8825), if necessary you can give the Flip the plug into its connection on the board, or modify these lines, toggling between "true" and "false" as needed:
// Invert the stepper direction. Change (or reverse the motor connector) if an axis goes the wrong way.
#define INVERT_X_DIR true
#define INVERT_Y_DIR true
#define INVERT_Z_DIR true

// @section extruder

// For direct drive extruder v9 set to true, for geared extruder set to false.
#define INVERT_E0_DIR false
If you have come this far, I hope you have been successful in the update, if you have any difficulties or problems during the process please do not hesitate to contact us.
Related Products


2 Comment(s)
Links are not working for:
Pack with common fans.
Pack with ball bearing fans,
This is because we are out of stock of one or more products in the pack. We are working to have stock as soon as possible. Sorry for the inconvenience.
Why did you disable STEALTHCHOP in your 2.0.7.2 firmware for this SKR v1.4 board and TMC2209 ?
Yes by default because TMC2209 are silent enough in standard mode, STEALTHCHOP can be turned on in LCD menu anyway, also edit current and sensorless homing sensibility.
Leave a Comment