

Super Slicer is a "Laminator" or "Slicer" for 3D Printing.
These programs generate the instructions (GCode) that our 3D printers interpret to print the parts.
There are many alternatives on the market, but this laminator has some features that make it stand out:
- It is free.
- It is open source.
- Generate high-quality parts and instructions. Compared with other programs it can offer us better results.
- You have a huge number of options.
- Includes compatibility with all 3D printers, plus Marlin, Klipper, Reprapfirmware, etc.
- It has exclusive functions, such as:
- "Only one perimeter on Top surfaces" that improves the surface finish of the pieces without adverse effects.
- "Brim Ears" that places the brim only in the necessary places.
- Generate typical calibration parts and setups with just a couple of clicks. Which will help us a lot to do these operations.
- It is partially translated, as PrusaSlicer is. Although the functions of today are not yet translated into Spanish.
Origin
The Slic3r project is founded by Alessandro Ranellucci in 2011, together with the RepRap community they develop it until version 1.3.0 in May 2018. There are no more releases to date.
Prusa Slicer takes over, incorporating its code as a base and adding advanced features such as variable layer height, a friendlier interface, and faster and optimized Gcode generation.
SuperSlicer is based on "PusaSlicer" which in turn is based on "Slicer". Super Slicer adds a multitude of configuration options and new functions. Also being updated with the improvements of the "PrusaSlicer" version on which it is based.
How to download and install it
The publications are frequent and explain the changes and new functions, you can find them at this link:
https://github.com/supermerill/SuperSlicer/releases
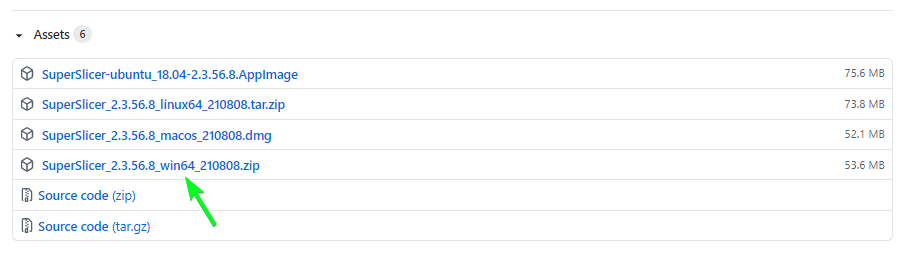
Each download file includes the operating system for which it is prepared, in this case we point to Windows 64, but we can also see MAC OS, Linux 64, and Ubuntu.
In the case of Windows, we simply have to unzip the .ZIP file and run the "superslicer.exe" file. We can create a shortcut on the desktop for convenience.
Interface
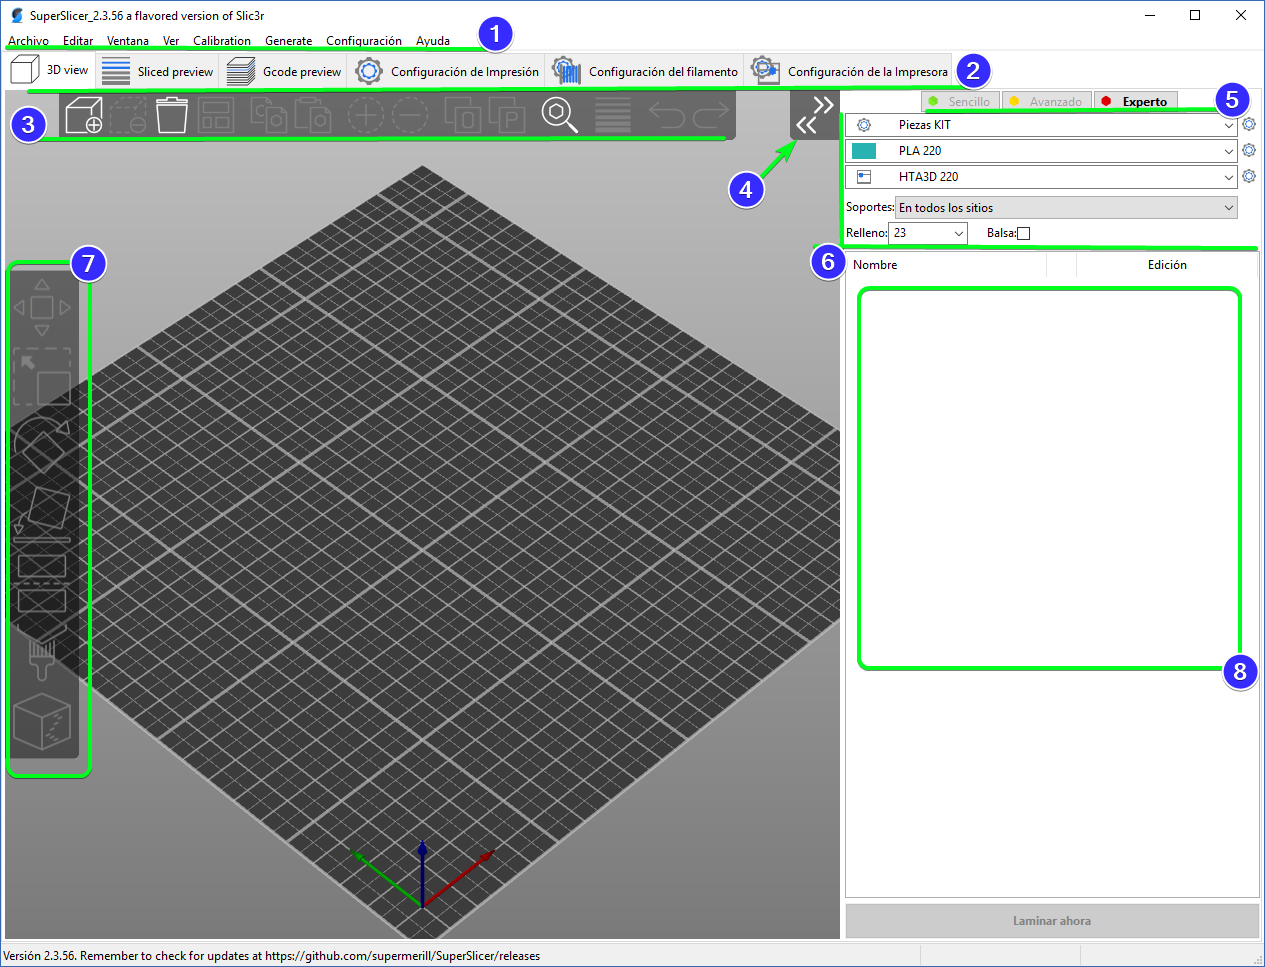
The interface is very simple and common with other programs:
- As soon as we start we find the toolbar, with the usual options such as open file, etc. We highlight:
- The "Calibration" tab where we can create our calibrations very quickly. Each type of calibration has its description and options.
- Configuration/Save firmware to printer. It allows us to easily update the firmware on 8-bit boards.
- Program tabs:
- 3D view. It shows us our work area, where we can place the pieces to print them in 3D.
- Sliced Preview. We can see how the model will be once printed, each of the 3D printing lines, we can see by layers.
- Gcode Preview. It is a view with greater detail than Sliced Preview, since it allows us to choose the type of view, by function it is the default option, but we can also see by fan speed or any other aspect that we need to check. Also show or not retractions, trips, color changes, etc.
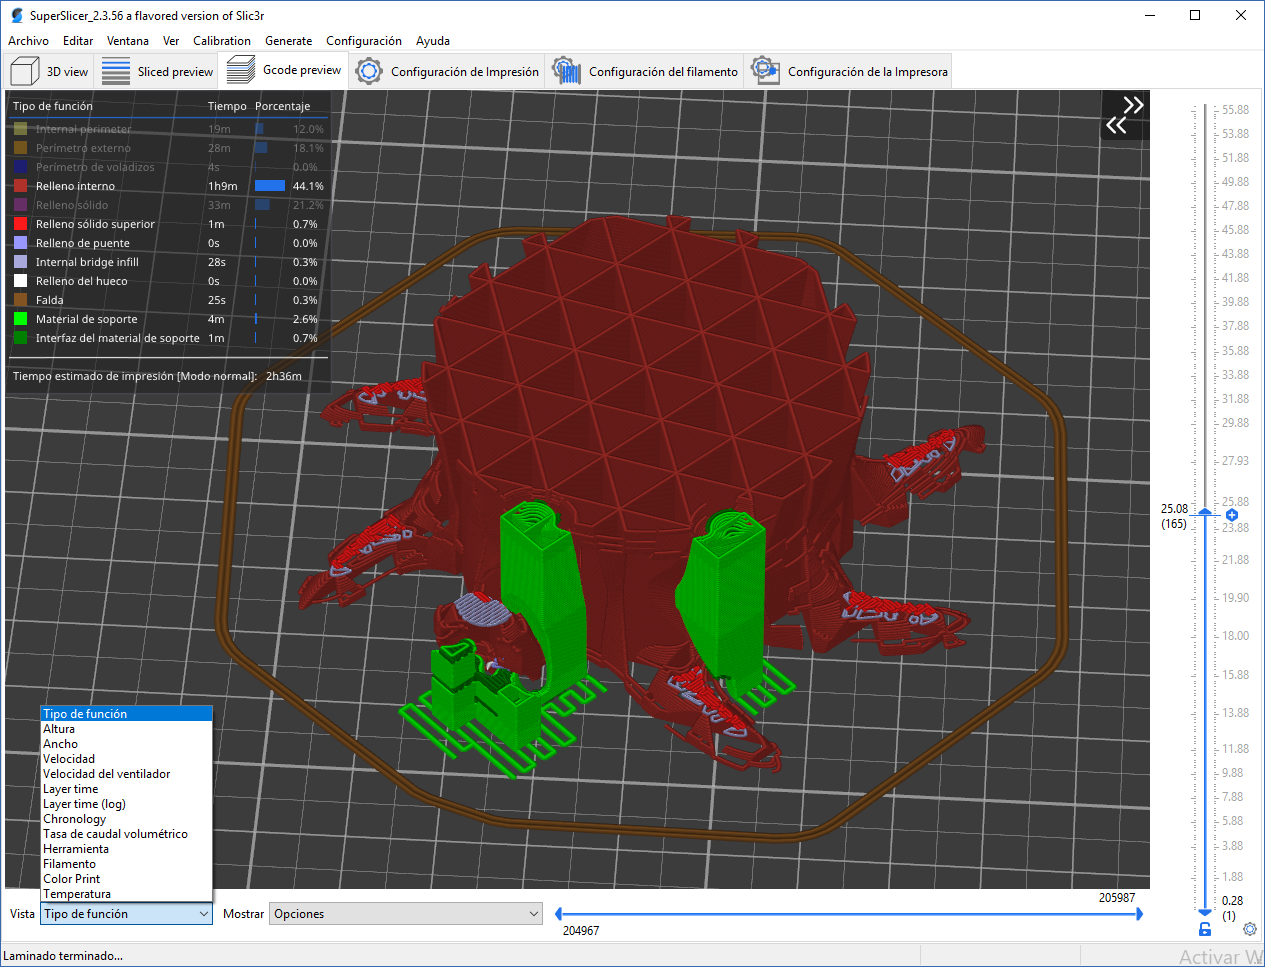
It is a detailed and advanced Gcode viewer that will help us control every detail of our most complex 3D prints. - Print settings. It is where we configure the main parameters of our 3D printing, such as: perimeters, layers, fill, skirt, supports, speed, flow and extrusion width, etc.
- Filament configuration. Here we adjust things related to the 3D printing material, such as temperatures, speed limits, cooling, and parameters that override other settings (for example retraction length for each filament), custom gcode, etc.
- Printer settings. We define the parameters of our machine, the size of the printing volume, type of firmware, custom Gcode, etc.
- Top bar to handle STLs. With these we can:
- Add file and delete them.
- Sort them in the available space.
- Increase or decrease the number of copies.
- Search within the program with the magnifying glass (very useful).
- Activate variable layer height.
- Button to show or not the side panel. Very useful on small monitors.
- "Difficulty" selector, shows us more or fewer options according to our experience in 3D printing, our recommendation is to use the advanced mode and try to manipulate the options marked in green to a greater extent, since there are options that are considered very useful advanced.
- Profile selector. Here we can easily switch between the different configurations that we will accumulate over time, and / or the pre-established profiles. It also allows us to overwrite the fill percentage and the use of supports, since they are options that are modified very frequently.
- Side panel to edit the pieces. Allows us:
- Move the parts.
- Escale.
- Rotate.
- Place on the base, using a flat face as a reference.
- Cut.
- Paint supports. To define the areas that we will support and those that we will not.
- Paint seam, to define where the outer perimeters will begin and imperfections are more likely to remain.
- Objects and modifiers panel. It will show a list with all the STLs that we have in the program.
Set up a profile for our 3DSteel, P3Steel or other printers
This program has a huge amount of profiles, we can use some of them for our P3Steel by making slight changes.
As a starting point we can use well-proven profiles, such as Custom, Prusa FFF or Voron, also selecting the nozzle size.
For this we have to go to the configuration wizard, we can do this at any time since it will not delete the user profiles. Preset profiles cannot be edited, and we can always turn to them for reference.
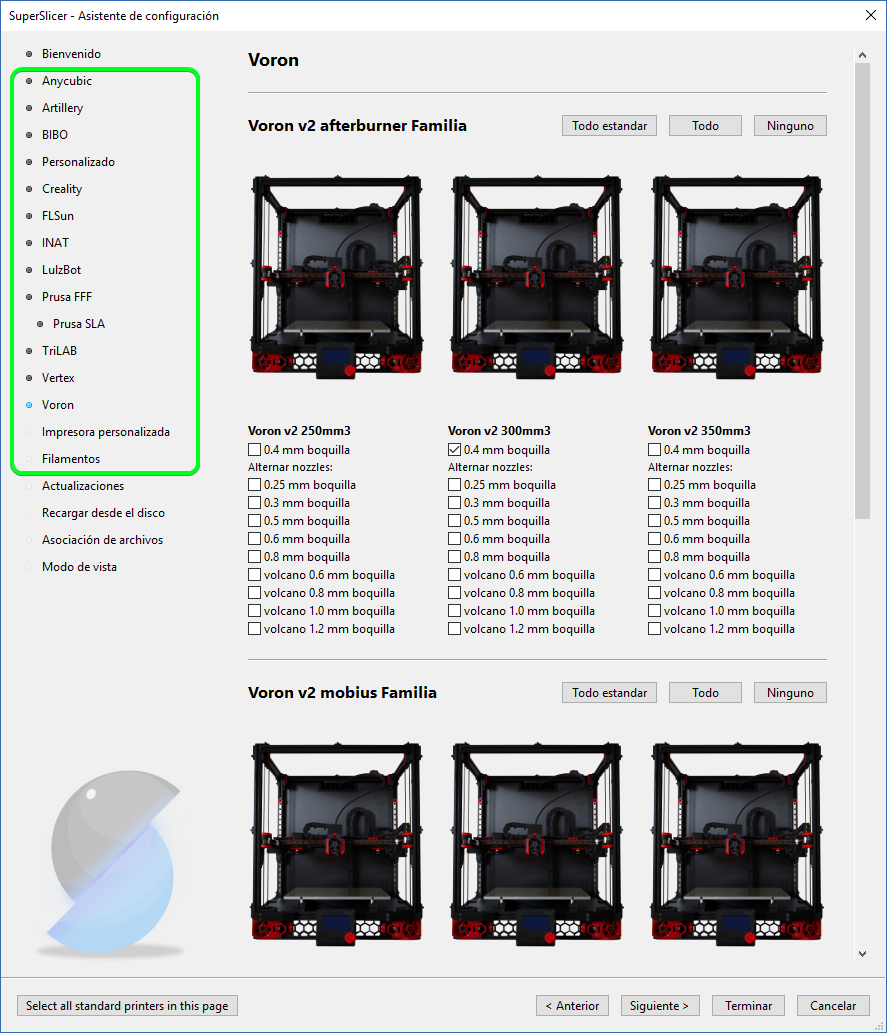
Once we have brought the preset profiles, for example for Prusa Mk3s+ of 0.4mm we will see this:
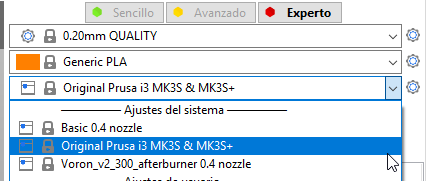
If we have marked more number of 3D printers, more will be shown.
We go to the configuration of the 3D printer and make the following changes:
Set the size of the heated bed: 220 in X and 220 in Y, with the origin at 10, 10.
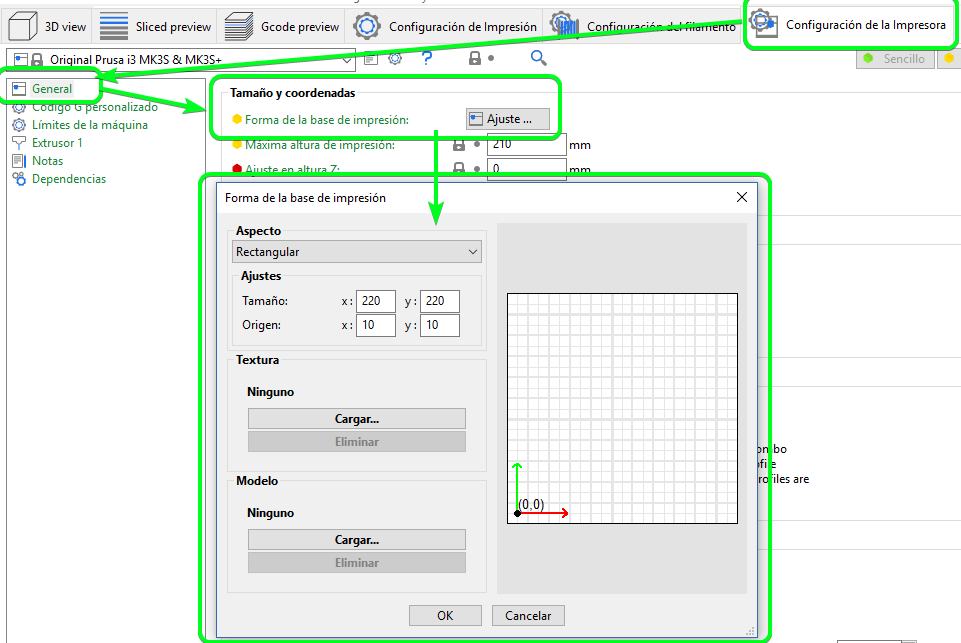
In Custom Gcode we include the following, replacing what is by default with this code (or whatever the user prefers):
Initial G Code:
M190 S[first_layer_bed_temperature]; calienta cama y espera
M104 S[first_layer_temperature]; calienta hotend sin esperar
M280 P0 S160; reset 3dtouch
G28 ; home all axes
G29; nivelar
G1 Z5 F5000 ; lift nozzle
G1 Y100 F5000; Evita pinzas
M109 S[first_layer_temperature]; espera hotend
Final G code:
M104 S0 ; turn off temperature
M140 S0 ; turn off bed
M107 ;Turn off fan
G1 X205 Y205 F5000; Aparta cabezal
M84 ; disable motors
Besides this, I personally like (not essential):
- Use firmware retraction (to be able to make adjustments from the LCD).
- Disable the silent mode of the program, since personally with the TMC2209 I do not consider it necessary. You can activate it from the LCD at any time with 3DSteel printers.
- Set the "raise Z" option to a lower value, since 0.4 is considered excessive for most 3D prints, 0.1 is more than enough.
Once this is done we can save the profile of the 3D printer as a new one.
To "release a Profile":
- We select the printer to which it originally belongs in "Printer Configuration".
- We select the profiles that we want to "release".
- We enter the profile, in dependencies we mark "All Compatible Printers" and in "Condition of Compatible Printers" we delete the text.
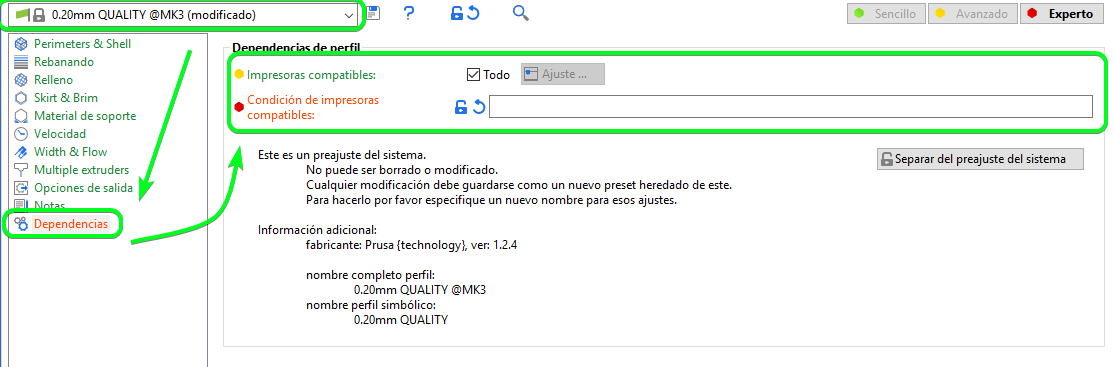
- Once this is done we can save the profile as a new one.
- We can also edit it at will.
It is important to take into account the mechanics of our printer before taking the profile, choosing a similar one. For a 3DSteel with a 0.4 nozzle (and direct extruder), we can take as a reference the profiles of a Cartesian printer with a 0.4 nozzle and direct extruder, such as the MK3s+, taking into account that the hardware, such as the structure, is superior in our 3DSteel , so we can obtain better results with the same parameters.
Use the calibration options
These tools are simple and very useful:
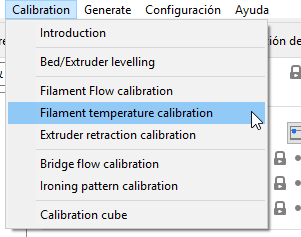
We find:
- Introduction.
- First layer adjustment (leveling).
- Flow Calibration.
- Calibration of the optimum temperature of the filament. We are going to use this as an example. It allows us to find the optimal temperature for that particular filament, using the specific configuration. Normally, filament manufacturers give a temperature range, because the optimal temperature depends on many factors, such as printing speed, filament manufacturing batch, type of part, geometry, etc.
- Withdrawal.
- Flow for "bridges"
- Ironing of the superficial face.
- Calibration cube for general checks.
Once we have decided the calibration that we are going to do, a window opens with: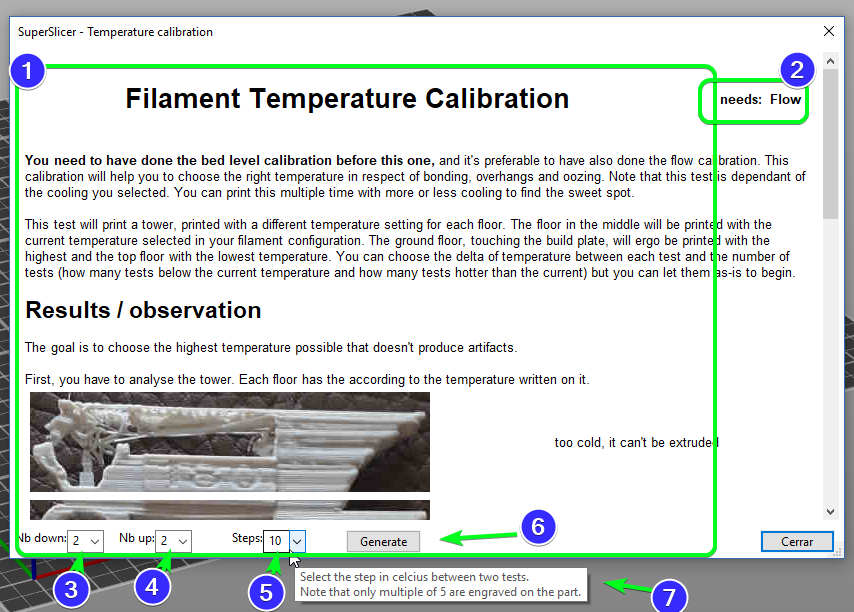
- Description of the calibration, with images.
- Notice of prerequisites, in this case "Flow" since if the flow is not correctly calibrated before doing this calibration we may have confusion.
- Number of "steps" below the temperature that we currently have selected.
- Number of upper steps.
- Step size, for example, in this case selecting a step of 10, we will have: -20, -10, 0, +10, 20. This is fine for a zoom, for a finer calibration we can make steps of 5 degrees centigrade . This will depend on what we are looking for.
- Generate button, which will generate the part for us (you do not have to download any STL)
- If we leave the cursor over the options, a very useful explanatory text appears, in this it warns us that only multiples of 5 will be printed on the model.
Once adjusted we find this:
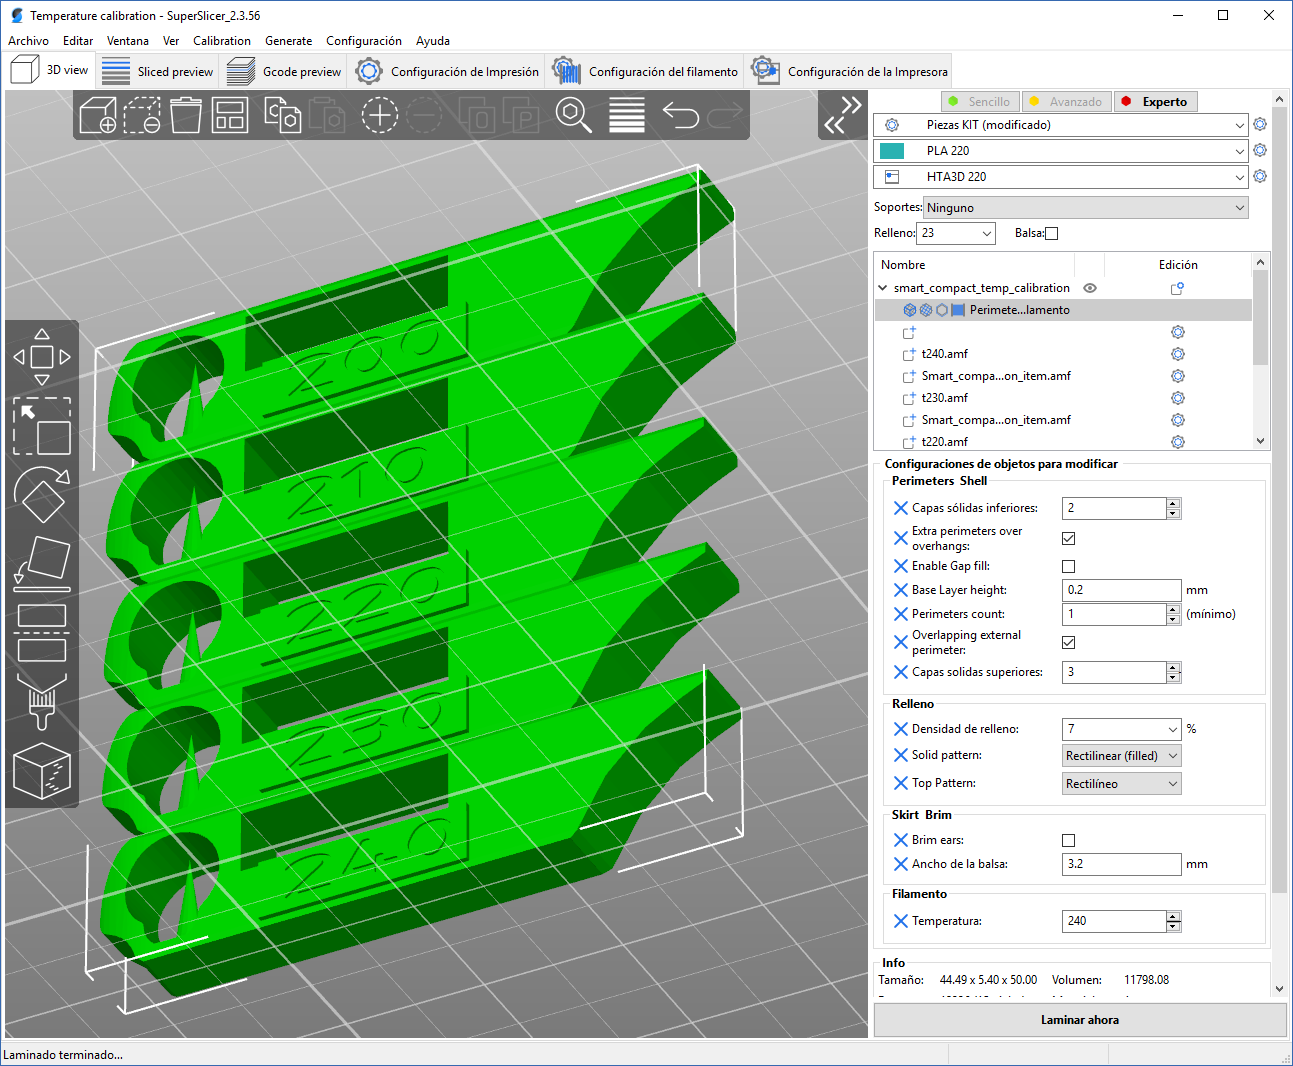
The model perfectly indicates the temperature at which it will be printed and in the right panel we can see all the modifications that have been activated so that the calibration is optimal, such as only 7% infill, 1 perimeter, etc.
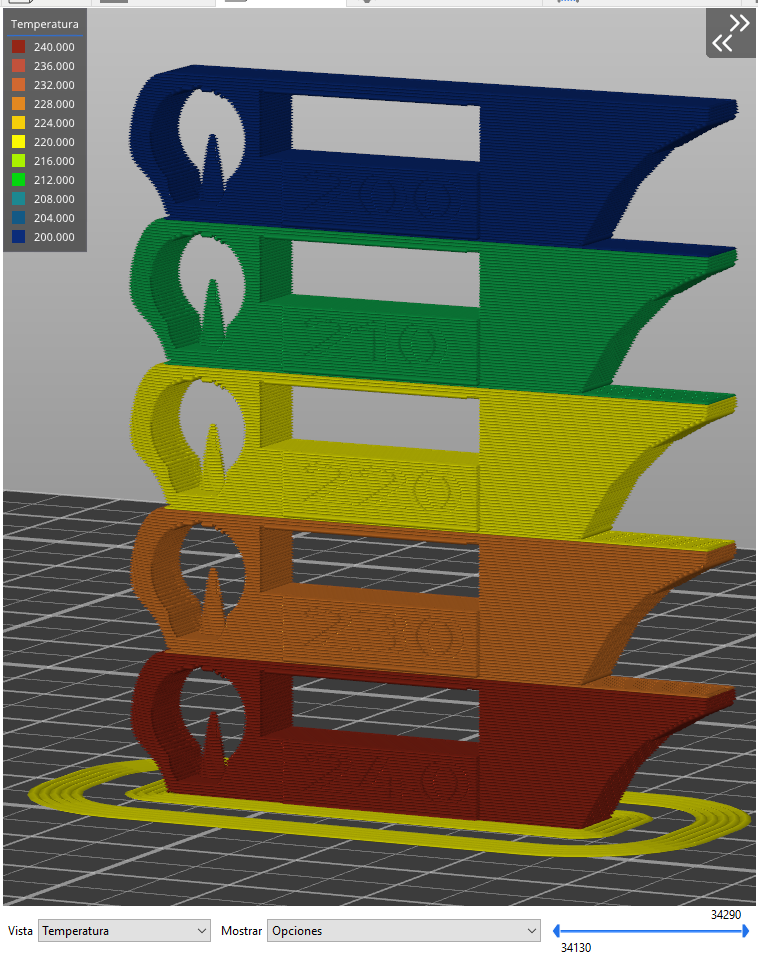
If we analyze the Gcode selecting the temperature as the type of view, we find that it is perfectly configured in the code:
The same can be applied to all other calibrations, in order to always get the most out of our 3D prints.
Did you already know this program? Do you have any questions about it? You can use the comment section to leave a few words. This will motivate us to write more articles like this one.
Related Products


5 Comment(s)
No conocía el programa, pero me voy a poner a aprenderlo ya mismo. Esto junto a mi 3DSteel V2 será un punto de inflexión en la calidad de mis impresiones ????
Espero que así sea y puedas conseguir los mejores resultados! Muchas gracias =D
Hasta ahora no lo había probado pero lo voy a probar porque se ve muy potente y la verdad que es rápido manejando la previsualización. Tengo una Artillery GENIUS que imprime muy bien y si este programa es capaz de mejorar todavía más la calidad de impresión... buff. Enhorabuena por el artículo, ha resultado muy útil para hacerme una idea de lo que ofrece el software. ¡Saludos!
Muy buen tutorial. Se ve el trabajo que se ha hecho para mostrar en imágenes las partes del interfaz, las configuraciones, etc. Insuperable, y mas didáctico que los habituales videos con la cara del autor y mucha palabrería inútil.
You are wrong about Superslicer beingva laminator. It is a delaminator that tskes a solid object and slices the object into layers. A laminator does just the opposite, assembling layers into a solid objects. Do your research before writing about a topic.
Thank you for your linguistic note. This article was originally written in Spanish. In Spanish, the term "Laminador" is commonly used. The model, in three dimensions, is decomposed into layers or "láminas", then these "láminas" are decomposed into lines (perimeters, fills, etc.). That is why this term is used in Spanish, and therefore also in the text translated into English. Delamination in 3D printing is a term that is often used to refer to a 3D printing defect, when layers separate.
Genial
Leave a Comment