
 with Arduino IDE or using .HEX files")
Marlin 2.0 is now available. And, although it is still in the "beta" phase, in RAMPS it is stable enough to be used, and it has many important advantages over versions 1.1.X. These include:
- Complete compatibility with TM2130, including menus to adjust the intensity, operating mode, sensitivity for sensorless homing, etc.
- Improved acceleration and movement system through JUNCTION_DEVIATION and S_CURVE_ACCELERATION. These two characteristics produce better direction changes and smoother accelerations. Optimizes print time and quality, while keeping noise and vibrations low.
- Improved interface, with new and restructured menus, which make the tasks of changing the filament, preheating, etc. more comfortable and easier.
If you are looking for how to install Marlin 2.0 on your P3Steel to keep it updated, this post will interest you.
Method A, load the firmware using the precompiled .HEX files:
This method is the simplest, since the firmware is already prepared so that it is simply loaded onto the board using the USB port.
STEP 1:
Download the .HEX file of the 3DSteel, it is available in this link.
STEP 2:
Connect the printer via USB, usually the drivers will be recognized automatically by the computer, otherwise it is advisable to install them together with Arduino IDE.
STEP 3:
Install a program to load the firmware, AvrDude is the simplest. Cura and PrusaSlicer also do this function, besides generating the Gcode.
STEP 4:
Load the firmware. Using Avr Dude you have to select ATMEGA16 processor and select the file and clink on FLASH. Using Curaor PrusaSlicer it is not necessary to select the processor.
Do not disconnect the USB while it is being charged, a message will be shown stating that it was successful when finished.
Method B, load the firmware using the source code and Arduino IDE:
This method is more complex but has the advantage that you can edit any configuration.
STEP 1:
Download and install Arduino IDE, we recommend the last stable version.
STEP 2:
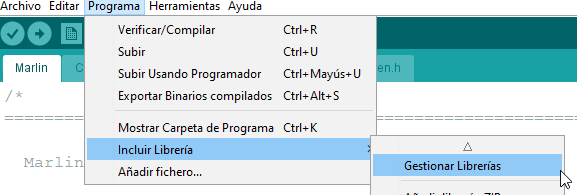
Install all the necessary libraries, you can do it directly from the program, in "Program" / "Include Library" / "Manage Libraries"
Once inside the menu we have to look for the libraries to install:
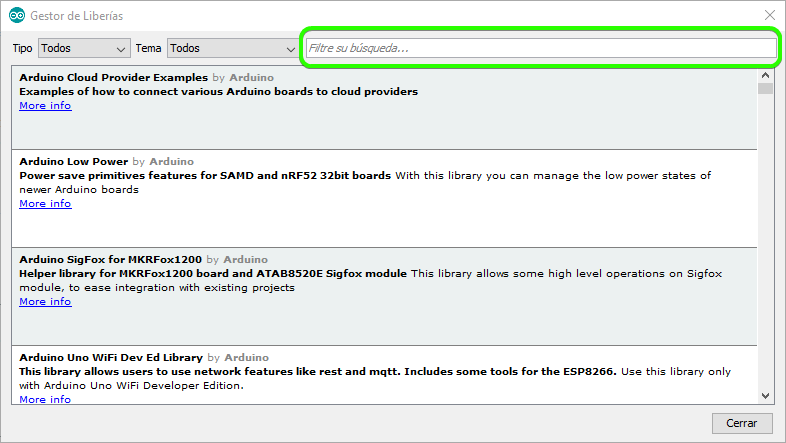
Here we have to install the libraries U8glib (by oliver) for the graphic LCD and TMCStepper (by teemuatlut) for TMC2130.
Con esto tendremos el programa preparado para compilar
STEP 3:
Download our Marlin version, we recommend the last stable version. You can always go back as we will keep the previous versions public.
Unzip and open the file Marlin.ino.
Once opened, the configuration and advanced configuration files will be displayed in the program's tabs. You can edit them if you wish, under the user's own responsibility.
STEP 4:
Connect the printer via USB, generally the drivers will be recognized automatically by the computer, otherwise it is advisable to install them together with the Arduino IDE.
STEP 5:
Load the firmware. To do this, we click on the button with an arrow:
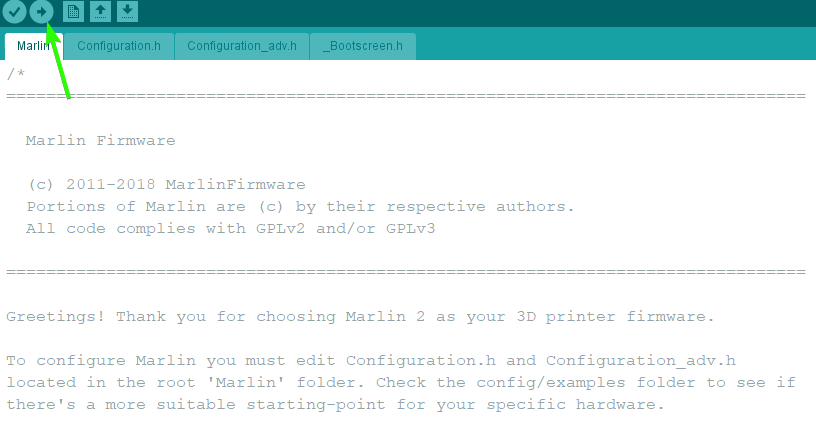
Do not disconnect the USB while it is being charged, a message will be shown stating that it was successful when finished.
If you do not find any preconfigured version in your language, please, tell us and we will generate the file. If you have any questions please do not hesitate to contact us using the contact form from our web.
Related Products
 16u2")


 - Compatible with SPI - Compatible with TMC2130")
 - Compatible with SPI - Compatible with TMC2130")
7 Comment(s)
con el programa AvrDude no me queda claro donde tengo que darle para que carge el programa si me podiais ayudar seria de gran ayuda gracias
Puedes usar Prusa Slic3r si tienes dificultad con AvrDude
al compilar el marlin en el programa arduino IDE me sale esto:\r\n\r\nArduino:1.8.13 (Windows Store 1.8.42.0) (Windows 10), Tarjeta:"Arduino Mega or Mega 2560, ATmega2560 (Mega 2560)"\r\n\r\n\r\n\r\n\r\n\r\n\r\n\r\n\r\n\r\n\r\n\r\n\r\n\r\n\r\n\r\n\r\n\r\n\r\n\r\n\r\n\r\nsketch\\src\\HAL\\HAL_AVR\\u8g_com_HAL_AVR_sw_spi.cpp:65:10: fatal error: U8glib.h: No such file or directory\r\n\r\n #include <U8glib.h>\r\n\r\n ^~~~~~~~~~\r\n\r\ncompilation terminated.\r\n\r\nexit status 1\r\n\r\nError compilando para la tarjeta Arduino Mega or Mega 2560.\r\n\r\n\r\n\r\nEste informe podría contener más información con\r\n"Mostrar salida detallada durante la compilación"\r\nopción habilitada en Archivo -> Preferencias.
Te dice que instales la librería U8glib: https://bintray.com/olikraus/u8glib
Arduino: 1.8.13 (Windows Store 1.8.42.0) (Windows 10), Board: "Arduino Mega or Mega 2560, ATmega1280"
In file included from c:\users\ranal\appdata\local\temp\arduino_build_377771\sketch\src\inc\marlinconfig.h:49:0,
from sketch\src\HAL\AVR\MarlinSerial.cpp:39:
c:\users\ranal\appdata\local\temp\arduino_build_377771\sketch\src\inc\SanityCheck.h:1225:4: error: #error "Please enable only one probe option: PROBE_MANUALLY, SENSORLESS_PROBING, BLTOUCH, FIX_MOUNTED_PROBE, NOZZLE_AS_PROBE, TOUCH_MI_PROBE, SOLENOID_PROBE, Z_PROBE_ALLEN_KEY, Z_PROBE_SLED, or Z Servo."
#error "Please enable only one probe option: PROBE_MANUALLY, SENSORLESS_PROBING, BLTOUCH, FIX_MOUNTED_PROBE, NOZZLE_AS_PROBE, TOUCH_MI_PROBE, SOLENOID_PROBE, Z_PROBE_ALLEN_KEY, Z_PROBE_SLED, or Z Servo."
^~~~~
In file included from sketch\src\inc/MarlinConfig.h:49:0,
from sketch\src\MarlinCore.h:24,
from sketch\src\MarlinCore.cpp:31:
sketch\src\inc/SanityCheck.h:1225:4: error: #error "Please enable only one probe option: PROBE_MANUALLY, SENSORLESS_PROBING, BLTOUCH, FIX_MOUNTED_PROBE, NOZZLE_AS_PROBE, TOUCH_MI_PROBE, SOLENOID_PROBE, Z_PROBE_ALLEN_KEY, Z_PROBE_SLED, or Z Servo."
#error "Please enable only one probe option: PROBE_MANUALLY, SENSORLESS_PROBING, BLTOUCH, FIX_MOUNTED_PROBE, NOZZLE_AS_PROBE, TOUCH_MI_PROBE, SOLENOID_PROBE, Z_PROBE_ALLEN_KEY, Z_PROBE_SLED, or Z Servo."
^~~~~
In file included from c:\users\ranal\appdata\local\temp\arduino_build_377771\sketch\src\inc\marlinconfig.h:49:0,
from sketch\src\HAL\AVR\HAL.cpp:24:
c:\users\ranal\appdata\local\temp\arduino_build_377771\sketch\src\inc\SanityCheck.h:1225:4: error: #error "Please enable only one probe option: PROBE_MANUALLY, SENSORLESS_PROBING, BLTOUCH, FIX_MOUNTED_PROBE, NOZZLE_AS_PROBE, TOUCH_MI_PROBE, SOLENOID_PROBE, Z_PROBE_ALLEN_KEY, Z_PROBE_SLED, or Z Servo."
#error "Please enable only one probe option: PROBE_MANUALLY, SENSORLESS_PROBING, BLTOUCH, FIX_MOUNTED_PROBE, NOZZLE_AS_PROBE, TOUCH_MI_PROBE, SOLENOID_PROBE, Z_PROBE_ALLEN_KEY, Z_PROBE_SLED, or Z Servo."
^~~~~
In file included from c:\users\ranal\appdata\local\temp\arduino_build_377771\sketch\src\inc\marlinconfig.h:49:0,
from sketch\src\HAL\AVR\HAL_SPI.cpp:34:
c:\users\ranal\appdata\local\temp\arduino_build_377771\sketch\src\inc\SanityCheck.h:1225:4: error: #error "Please enable only one probe option: PROBE_MANUALLY, SENSORLESS_PROBING, BLTOUCH, FIX_MOUNTED_PROBE, NOZZLE_AS_PROBE, TOUCH_MI_PROBE, SOLENOID_PROBE, Z_PROBE_ALLEN_KEY, Z_PROBE_SLED, or Z Servo."
#error "Please enable only one probe option: PROBE_MANUALLY, SENSORLESS_PROBING, BLTOUCH, FIX_MOUNTED_PROBE, NOZZLE_AS_PROBE, TOUCH_MI_PROBE, SOLENOID_PROBE, Z_PROBE_ALLEN_KEY, Z_PROBE_SLED, or Z Servo."
^~~~~
In file included from sketch\src\MarlinCore.cpp:165:0:
sketch\src\feature/bedlevel/bedlevel.h:58:28: error: 'GRID_MAX_POINTS_X' was not declared in this scope
typedef float bed_mesh_t[GRID_MAX_POINTS_X][GRID_MAX_POINTS_Y];
^~~~~~~~~~~~~~~~~
sketch\src\feature/bedlevel/bedlevel.h:58:28: note: suggested alternative: 'GRID_MAX_POINTS_Y'
typedef float bed_mesh_t[GRID_MAX_POINTS_X][GRID_MAX_POINTS_Y];
^~~~~~~~~~~~~~~~~
GRID_MAX_POINTS_Y
In file included from sketch\src\inc/MarlinConfigPre.h:39:0,
from sketch\src\inc/MarlinConfig.h:28,
from sketch\src\MarlinCore.h:24,
from sketch\src\MarlinCore.cpp:31:
c:\users\ranal\appdata\local\temp\arduino_build_377771\sketch\configuration.h:1282:29: error: 'GRID_MAX_POINTS_X' was not declared in this scope
#define GRID_MAX_POINTS_Y GRID_MAX_POINTS_X
^
sketch\src\feature/bedlevel/bedlevel.h:58:47: note: in expansion of macro 'GRID_MAX_POINTS_Y'
typedef float bed_mesh_t[GRID_MAX_POINTS_X][GRID_MAX_POINTS_Y];
^~~~~~~~~~~~~~~~~
c:\users\ranal\appdata\local\temp\arduino_build_377771\sketch\configuration.h:1282:29: note: suggested alternative: 'GRID_MAX_POINTS_Y'
#define GRID_MAX_POINTS_Y GRID_MAX_POINTS_X
^
sketch\src\feature/bedlevel/bedlevel.h:58:47: note: in expansion of macro 'GRID_MAX_POINTS_Y'
typedef float bed_mesh_t[GRID_MAX_POINTS_X][GRID_MAX_POINTS_Y];
^~~~~~~~~~~~~~~~~
In file included from sketch\src\feature/bedlevel/bedlevel.h:61:0,
from sketch\src\MarlinCore.cpp:165:
sketch\src\feature/bedlevel/abl/abl.h:28:8: error: 'bed_mesh_t' does not name a type; did you mean 'bed_watch_t'?
extern bed_mesh_t z_values;
^~~~~~~~~~
bed_watch_t
In file included from c:\users\ranal\appdata\local\temp\arduino_build_377771\sketch\src\inc\marlinconfig.h:49:0,
from sketch\src\HAL\AVR\Servo.cpp:55:
c:\users\ranal\appdata\local\temp\arduino_build_377771\sketch\src\inc\SanityCheck.h:1225:4: error: #error "Please enable only one probe option: PROBE_MANUALLY, SENSORLESS_PROBING, BLTOUCH, FIX_MOUNTED_PROBE, NOZZLE_AS_PROBE, TOUCH_MI_PROBE, SOLENOID_PROBE, Z_PROBE_ALLEN_KEY, Z_PROBE_SLED, or Z Servo."
#error "Please enable only one probe option: PROBE_MANUALLY, SENSORLESS_PROBING, BLTOUCH, FIX_MOUNTED_PROBE, NOZZLE_AS_PROBE, TOUCH_MI_PROBE, SOLENOID_PROBE, Z_PROBE_ALLEN_KEY, Z_PROBE_SLED, or Z Servo."
^~~~~
exit status 1
Error compiling for board Arduino Mega or Mega 2560.
This report would have more information with
"Show verbose output during compilation"
option enabled in File -> Preferences.
I suggest to use PlataformIO with VScode instead or Arduino for Marlin 2.https://marlinfw.org/docs/basics/install_platformio_vscode.html
Tengo la impresora 3DSteel (V1) con el marlin 2.0.1
He descargado el HEX de la version 2.0.6 de vuestra página y al cargarlo en la impresora algo no va bien. Al hacer el home ahora el carro se va a la parte contraria de antes (derecha) y cuando he dado a imprimir ha provocado saltos en la correa ya que no paraba al hacer el home de X. El de Y lo ha hecho bien.
He tenido que realizar un downgrade.
Puedes probar de nuevo con la última versión, la 2.0.7.2. Tras instalarla es recomendable hacer de nuevo todas las comprobaciones del tutorial: https://wikifab.org/wiki/Montaje_3DSteel_-_Tutorial_4_-_Puesta_a_Punto En el caso de los motores, puedes corregir el sentido de giro dando la vuelta a la clavija en la Ramps 1.6+ Para cualquier otra dificultad que tengas puedes contactarnos directamente, para una respuesta rápida: https://www.hta3d.com/es/contacto
Al igual que Rodrigo, tengo la P3STEEL y el home X me lo hace a la derecha sin parar.
Tengo instalada la 2.0.7.2 y he vuelto a realizar todas las comprobaciones del tutorial. Por el momento solo consigo que la impresora funcione con el original 2.0.1.
Por favor, podrían revisar el firmware? No tengo experiencia como para modificar yo el código Marlin y entiendo que si lo han subido específicamente para esta impresora debería ir bien, no?.
¿Has realizado las comprobaciones del último paso del tutorial tras actualizar el firmware? Realiza por favor estas comprobaciones: https://wikifab.org/wiki/Montaje_de_P3steel_por_HTA3D_-_Tutorial_7_-_Puesta_a_Punto Y cuando hayas acabado puedes enviarnos un email a [email protected] con los puntos que te fallen y el número de pedido para que te ayudemos personalmente. Saludos!
dear friend. I using a4988 but when I compile then I have same error.
In file included from C:\Marlin\Marlin-2.0.7.2-3dsteel-v1\Marlin\src\inc\MarlinConfig.h:49:0,
from C:\Marlin\Marlin-2.0.7.2-3dsteel-v1\Marlin\src\HAL\AVR\HAL.cpp:24:
C:\Marlin\Marlin-2.0.7.2-3dsteel-v1\Marlin\src\inc\SanityCheck.h:2797:6: error: #error "It is highly recommended to have adjustable current drivers to prevent damage. Disable this line to continue anyway."
#error "It is highly recommended to have adjustable current drivers to prevent damage. Disable this line to continue anyway."
how I can resolve this errors. thnx
The text explains it all, "It is highly recommended to have adjustable current drivers to prevent damage. Disable this line to continue anyway" Basically it recommends using more modern drivers for the active functions.
hola si alguien me puede ayudar con el marlin de la prusa dual el eje z se mueve normalmente pero con un desfase(si marco 10mm anda 20 mm.Pero al darle al homing no se mueve nada haciendo mucho ruido los motores.Tengo una placa keyes v1.4 y los ejes z los conecto a ella con un duplicdor ya que la placa solo trae 1 conexion z
Leave a Comment