

PID vs Bang Bang
If we want to control the temperature of an element of our 3D printer through a heater and a switch, the first thing one could think of is:
- Select a setpoint temperature.
- Heat when the actual temperature is below the setpoint.
- Do not heat when the temperature is equal to or greater than this value.
This simple method is the "Bang Bang" system, it works like a thermostat would. And it works fine in the following assumptions:
- The thermal inertia of the element is very high.
- The heating speed is very low.
- A few degrees difference and a small temperature swing will not cause a problem.
This configuration is known as "Bang bang" and has an advantage over the PID configuration, low CPU usage.
It is perfectly valid for heated beds that are not very powerful, with high thermal inertia and little thermal expansion, as for example, when we use tempered borosilicate glass.
Bang bang is not an appropriate method for hotend or heated beds that are light and use metal strapping, as thermal fluctuations can cause:
- Thermal dilations in the bed causing visible Z marks.
- Color changes in the filament.
- Jams in the extruder.
These three problems can be solved by enabling and configuring the PID correctly. For the fuser, or for the fuser and bed, as required.
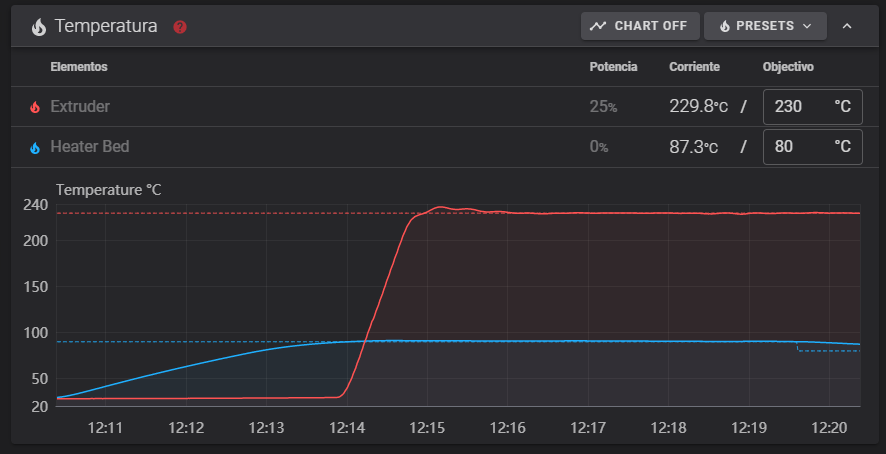
In the main image you can see an example and calibration of the PID, the temperature fluctuates sharply in intervals, this would be the behavior of the extruder configured as "Bang Bang", the 3D printer software extracts the PID values from these curves.
How does the PID work?
The PID regulates the heating power as necessary, when we are close to the target temperature we will heat with little power, while when we are far away we will heat with greater intensity, it also takes into account other factors such as the current heating rate and changes in this.
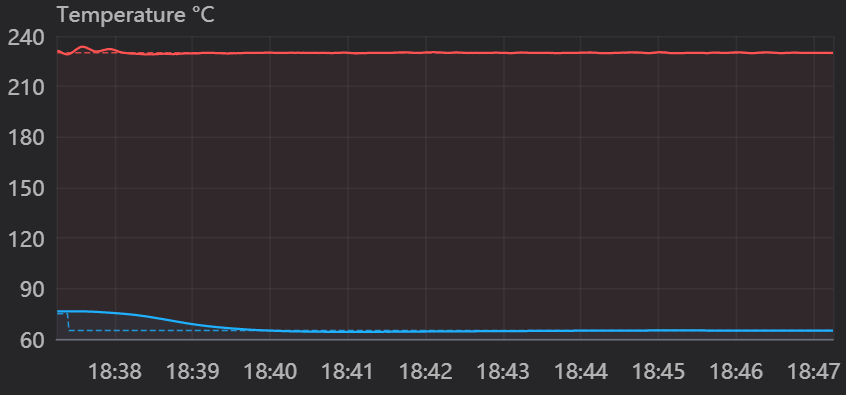
In the previous image we can see the stability of the temperature after a brief initial oscillation, this will provide us with a precise finish in our pieces, since the temperature is related to the extrusion, the thermal contraction of the elements (extruder and bed), the union between layers, the color and brightness of the pieces, etc. Keeping this constant ensures better results.
What does the acronym P.I.D. stand for?
P: Proporional.
I: Integral.
D: Derivative.
- The term P is the easiest to understand, since it offers to regulate the power supplied proportionally to the difference between the target and the actual temperature. If there are 2 degrees of difference, it will heat twice as if there is 1 degree.
- The term I is in charge of "damping" the term "P", it takes the heating rate as a reference and, among other things, prevents us from "overdoing it".
- The D term prevents the temperature from being fixed (I does not act) near the target temperature (P would not act either)
Precautions to consider:
The PID is calibrated under certain conditions, altering this may cause us to need to recalibrate the PID, or it may even generate certain problems:
- Layer fan.
Generally this is the element that causes the most conflicts: - It can drastically lower the temperature of the bed, causing the part to become detached or causing the Marlin protections to pop out due to excessive cooling of the bed.
To avoid this we recommend deactivating the layer fan in the first layers. - It can cause the same in the hotend, also if we use it for supports and it is used intermittently it can cause the temperature to fluctuate excessively. For this we enable in our Marlin:#define ADAPTIVE_FAN_SLOWINGWith this option enabled, if the extruder temperature drops excessively, the fan speed will reduce the time required for the fuser temperature to recover.
- Sock for the fuser. We recommend always putting it on to help keep the temperature as stable as possible, removing it may cause us to have to recalibrate the PID.
- Differences between printing bases, since if, for example, we place a glass, it has greater thermal inertia, and it might be advisable to calibrate the PID for this element.
In this video made by "Estudio Roble" the different variables involved and how they influence our system is shown in a mechanical, very visual way.
Gcode to adjust the PID:
- M301: Set Hotend PID.
M301 [C<value>] [D<value>] [E<index>] [F<value>] [I<value>] [L<value>] [P<value>] - M304: Set Bed PID.
M304 [D<value>] [I<value>] [P<value>]
If we want to fine-tune the PID for each print, we can calculate the values for each temperature and enter them in the material profile so that they are updated with each print and have different values, for example for PLA (190 and 60) and ABS (240 and 100)
We can also create certain Gcode that do a self-calibration of the PID, this is not recommended to do too frequently:
- M303: PID Autotune
M303 C<count> D<action> [E<index>] S<temp> U<flag>
In this image we can see the example of a printing with the PID correctly adjusted, it can be seen how, the extruder has very small oscillations due to start-up and changes in flow or layer fan, and how the bed is even more stable.
Do you find this article interesting? We invite you to comment on any questions in this regard, as well as share them on social networks so that you can help more people.
Related Products


Leave a Comment